Image to Click HTML Code Free Mobile Repairing
banner
Image to Click HTML Code Free Mobile Repairing
banner

Wednesday, 13 September 2017


IPhone 5s Charging Problem Solution Repair Ways - IPhone 5s चार्जिंग सलूशन जम्पर पिक्चर के साथ 


iPhone 5s Charging Ways Solution Jumper Problem Repair
Today we will discuss the issues on charging or charging Apple iPhone 5s , charging or charging problems often experienced by all cell phone brands in this world, this problem would make the dead lice or mobile phone users gadgets. Damage to the charging iPhone 5s  usually occurs because the plugins that have been damaged. Here are the steps to solve charging problem.


The first step that should be done is to replace the charger plug or the charger connector, usually  damage to the pin or needle in the charger plug. If after replacing the plugin does not solve the problem. Try the next step.
The second step checks charger lines as in the picture below, if there is a path-breaking try to do the jumper.
Reasons of Problems
Phone could be water damaged. पानी में जाने के कारण | 
Dust particles might be present in charging connector. डस्ट आने के कारण | 
Your charger might be faulty. चार्जर ख़राब यूज़ करने के कारण | 
Connection in the phone might be broken. चार्जिंग केबल कनेक्शन ख़राब हो जाने के कारण | 
Phone is encountered any physical damage. ज़मीन पर गिर जाने के कारण |
Any of the capacitors might be faulty. किसी कापसिटर के ख़राब हो जाने के कारण | 
Charging IC might be faulty.


Solution  


Step 1 - First Open your Mobile & Disassemble your PCB 
पहेले मोबाइल फ़ोन को ओपन करो  | 

Step 2- Wash mobile PCB using Acetone & thinner 
मोबाइल PCB को अच्छे से वश करे | 

Step 3 - Check iPhone 5s Dock Connector, if  Dock connector is damage than replace it 

चार्जिंग डॉक  कनेक्टर को चेक करेंगे | अगर  कनेक्टर टुटा है तो रीप्लेस करेंगे |  


Step 4  - If Dock Connector is ok , Than Check PCB Connector ( Replace if Broke ) 
अगर डॉक कनेक्टर सही है तो मोबाइल PCB पर लगे कनेक्टर को चेक करेंगे | ख़राब होने पर चेंज कर देंगे | 
Step 5 - Check Cold Testing (Resistance Value ) on Charging Pin No .

कनेक्टर की पिन नंबर 43 और 42 पर कोल्ड टेस्टिंग करेंगे |


देखे -  कैसे करे कोल्ड टेस्टिंग 


Step 6 - If No Resistance Found than Do Tracing , Check ( C12,C13,C368 for Short) 
अगर कोल्ड टेस्टिंग करने पर रीडिंग ना आये तब ट्रेसिंग करेंगे | उसकी सप्लाई लाइन में लगे कापसिटर चेक करेंगे |  


Step 6 - Change Charging IC ( Q2 -CSD68813w10) or make it jumper 

चार्जिंग IC को रीप्लेस करेंगे या आप उसे जम्पर भी कर सकते है 


Note: Every repairing solution posted here is tested by at least one member of our team. Use the information available here at Your Own Risk. We are not responsible if any harm comes to your device during the repairing process.


Tuesday, 12 September 2017


IPhone 6  Insert Sim IC Solution Jumper Problem Ways 

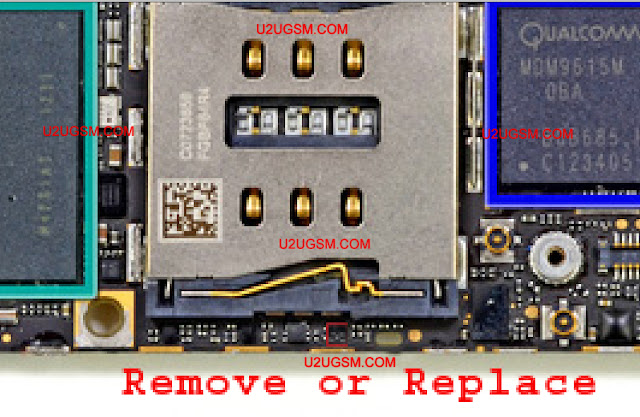
IPhone 6 Insert Sim IC Solution Jumper Problem Ways in case of insert sim problem in IPhone 6 it will show insert sim, sim not valid, and may not show signal.to solve IPhone 6 Insert Sim IC 

Solution Jumper Problem Ways we have to do a few simple steps as given in this post.in first step replace you sim and try it.scratch sim points in mobile slightly then try. Smartphone Repairing


Problem 

  1. Sim Card not detect ( सिम कार्ड शो ना करना )
  2. Sim Card Showing error Massage  ( किसी प्रकार का एरर शो करना )
  3. When Sim Card connected mobile goes off (सिम कार्ड लगाते ही मोबाइल बंद हो जाना ) 


Solution  

Step 1 - First Open your Mobile & Disassemble your PCB 
पहेले मोबाइल फ़ोन को ओपन करो  | 


Step 2- Wash mobile PCB using Acetone & thinner 
मोबाइल PCB को अच्छे से वश करे | 

Step 3 - Check Sim Connector, if Sim connector is damage than replace it 

सिम कनेक्टर को चेक करेंगे | अगर सिम कनेक्टर टुटा है तो रीप्लेस करेंगे |  


Step 4 - If sim connector is ok than check cold testing 
अगर सिम कनेक्टर सही है तब सिम कनेक्टर पे कोल्ड टेस्टिंग करेंगे 


Sim Connector 6 Pin Detail 

Pin 1 - Vsim - Reading  - 250 ohms to 800 ohms
Pin 2 - Sim Rst -Reading  - 250 ohms to 800 ohms
Pin 3-  Sim Clk -Reading  - 250 ohms to 800 ohms
Pin 4- Sim Data -Reading  - 250 ohms to 800 ohms
Pin 5 - Gnd - Beep


Pin 6 - NC / VPP or VCC 

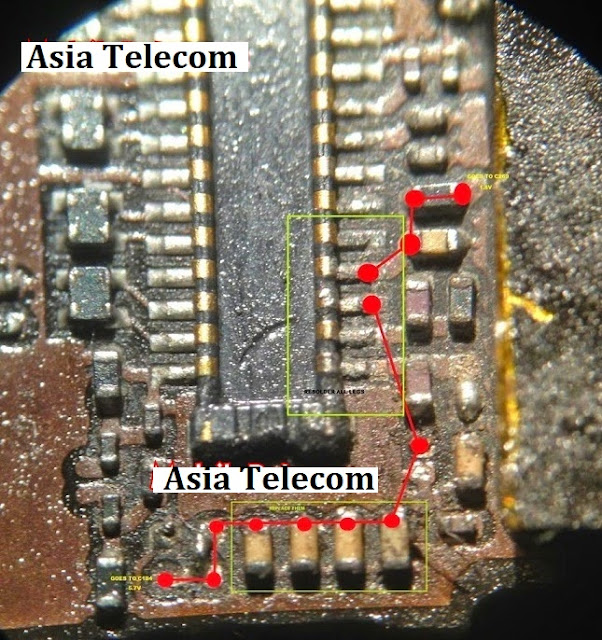
Step 5 - If No Resistance Found on any Sim pin than trace the supply line from sim connector tip.
अगर सिम कनेक्टर की पिन पर रेजिस्टेंस नहीं मिला तब ट्रेसिंग करो 

Step 6 - If no resistance found on Vsim Pin 1 than make it jumper with any capacitor (1.8 to 3V )
अगर Vsim पर हॉट टेस्टिंग करेंगे पर वोल्टेज नहीं आये और कोल्ड टेस्टिंग पर रेजिस्टेंस नहीं मिले , तब VSIM को किसी भी कापसिटर से जम्पर कर के वोल्टेज दे सकते है  

Step 7 - If No resistance found on Rst,Clk,data than Replce Sim IC 


IPhone 5 Insert Sim IC Solution Jumper Problem Ways 

IPhone 5 Insert Sim IC Solution Jumper Problem Ways in case of insert sim problem in IPhone 5 it will show insert sim, sim not valid, and may not show signal.to solve IPhone 5 Insert Sim IC 

Solution Jumper Problem Ways we have to do a few simple steps as given in this post.in first step replace you sim and try it.scratch sim points in mobile slightly then try. Smartphone Repairing


Problem 

  1. Sim Card not detect ( सिम कार्ड शो ना करना )
  2. Sim Card Showing error Massage  ( किसी प्रकार का एरर शो करना )
  3. When Sim Card connected mobile goes off (सिम कार्ड लगाते ही मोबाइल बंद हो जाना ) 


Solution  

Step 1 - First Open your Mobile & Disassemble your PCB 
पहेले मोबाइल फ़ोन को ओपन करो  | 


Step 2- Wash mobile PCB using Acetone & thinner 
मोबाइल PCB को अच्छे से वश करे | 

Step 3 - Check Sim Connector, if Sim connector is damage than replace it 

सिम कनेक्टर को चेक करेंगे | अगर सिम कनेक्टर टुटा है तो रीप्लेस करेंगे |  


Step 4 - If sim connector is ok than check cold testing 
अगर सिम कनेक्टर सही है तब सिम कनेक्टर पे कोल्ड टेस्टिंग करेंगे 


Sim Connector 6 Pin Detail 

Pin 1 - Vsim - Reading  - 250 ohms to 800 ohms
Pin 2 - Sim Rst -Reading  - 250 ohms to 800 ohms
Pin 3-  Sim Clk -Reading  - 250 ohms to 800 ohms
Pin 4- Sim Data -Reading  - 250 ohms to 800 ohms


Pin 5 - Gnd - Beep
Pin 6 - NC / VPP or VCC 

Step 5 - If No Resistance Found on any Sim pin than trace the supply line from sim connector tip.
अगर सिम कनेक्टर की पिन पर रेजिस्टेंस नहीं मिला तब ट्रेसिंग करो 

Step 6 - If no resistance found on Vsim Pin 1 than make it jumper with any capacitor (1.8 to 3V )

अगर Vsim पर हॉट टेस्टिंग करेंगे पर वोल्टेज नहीं आये और कोल्ड टेस्टिंग पर रेजिस्टेंस नहीं मिले , तब VSIM को किसी भी कापसिटर से जम्पर कर के वोल्टेज दे सकते है  

Step 7 - If No resistance found on Rst,Clk,data than Replce Sim IC 


Monday, 11 September 2017


iPhone 4S Light Problem Solution Backlight Jumper Ways Smartphone Repairing

Here’s the iPhone 4s hardware solution for Blue, White , Blank  Display lighting Problem. This problem may result to show a dark or black screen display for there is no illumination backlight LED on the back of the LCD screen.


Problem:- 
iPhone 4s White Display Solution
iPhone 4s Blank Display Problem
iPhone 4s Lcd Display Full Track Ways
iPhone 4s Display Light Ways

Blue ,Dark ,Blank Display
Display light / Backlight not working.
Hardware Solution


Check iPhone 4S light is not working , 
light is dim light is off or display is blank. 

Check Display Connector Pin No. 6 & Pin No.8 ( Cold Testing ). If resistance not found than trace supply line.

iPhone Display Connector Track Way 
To fix the dark screen display problem, you may first try to replace or install a new Display screen module, to easily confirm if the LCD’s backlight LED’s were still working or already damaged.

You can also check the LED’s using the multimeter if you can manage without damaging the LCD flex connector.

iphone 4s Back Light ic And Coil


If the newly installed LCD still shows the same problem and the LED light doesn’t light up, refer to the solution below and locate the highlighted components on the PCB board.

iPhone 4s LCD Display Problem Trace also each connection line paths were it is being connected to a lighting section.

If any track line is missing just make a jumper.


Note: Please note that even though every solution posted on our website is tested by one or more members of our team before posting, but still we do not take any responsibility for any damage it may cause to your cell phones. Use these repairing solutions at your own risk. Thank You.

Sunday, 10 September 2017


How to Update Apple Watch's watchOS Software


watchOS is the operating system that runs on the Apple Watch, powering its fitness tracking capabilities, apps, communication features, time-keeping abilities, and more. Apple plans to push regular updates to fix watchOS bugs, refine performance, and introduce new features, and the release of watchOS 2 alongside iOS 9 later today is a major uprade for the platform. (Update: Apple has delayed the public release of watchOS 2.) 


watchOS updates are installed in a unique way that differs from how we install iPhone and Mac updates, so we've crafted a quick tutorial to remind users how to get the latest version of watchOS on their Apple Watches so they're ready for watchOS 2. 

Before You Start

Before you try to download and install the new version of watchOS, make sure of the following: 
  1. Your iPhone has been updated to iOS 9.
  2. Your iPhone and Apple Watch are within range of each other.
  3. Your Apple Watch has at least a 50 percent charge.
  4. Your Apple Watch is connected to its charger.

The last two requirements are important. You will be able to download the new version of watchOS without a 50 percent charge or Apple Watch resting on its charger, but you won't be able to install it. During the installation step, you will instead see a message that the installation is paused and won't continue until Apple Watch is connected to the charger with at least a 50 percent charge. 

Downloading and Installing the Update

  1. Open the Apple Watch app on your iPhone and select the My Watch tab if necessary.
  2. Tap General, then tap Software Update.
  3. Tap Download and Install to begin the process.
  4. Enter your four-digit passcode on Apple Watch when prompted.
  5. The Apple logo and progress bar will appear when the software is installing. When finished, Apple Watch will restart.

If Something Goes Wrong


If, for some reason, the download freezes up or you can't get the software to install on Apple Watch, you can try restarting the device. 

Restarting 
  1. Hold down the Side button until the Power Off slider appears.
  2. Slide the bar to shut off Apple Watch.
  3. Hold down the Side button until the Apple logo appears.
  4. Wait for Apple Watch to restart.
  5. Enter your passcode when prompted.


Hard Reset 
If powering down Apple Watch does not work, you can also try a hard reset. This forces the device to shut off. It usually takes a bit longer to restart Apple Watch when you perform a hard reset. 

  1. Hold both the Side button and Digital Crown down at the same time.
  2. The screen will go blank, and then the Apple logo will appear.
  3. Wait for Apple Watch to restart.
  4. Enter your passcode when prompted.

Apple is rapidly iterating on watchOS, so don't be surprised if we continue to see frequent updates. watchOS arrives just five months after the Apple Watch's debut and brings a host of new features including native third-party apps, so most Apple Watch owners will want to upgrade as soon as possible and begin exploring what's new.


How to Install iOS 11 Public Beta on iPhone and iPad


Apple has released iOS 11 public beta to allow iPhone users to test the new iOS version. Loaded with a good many impressive features like customized Control Center, P2P money transfer, Dark Mode, the latest iOS ecosystem has been able to garner rev reviews from experts. Now, this is your turn to give it a try! Follow through this complete guide to download and install iOS 11 public beta on your iPhone or iPad.
You need to first sign up for the public beta testing program and enroll your device to download the iOS 11 Public beta. I would recommend you to first backup your iOS device before going ahead with the process. Also, try out the beta on your secondary device as it may contain some bugs that would affect your user-experience.


How to Download and Install iOS 11 Public Beta on iPhone and iPad

Note: Make sure your device is compatible with iOS 11.

How to Sign Up for iOS 11 Public Beta Testing Program

Step #1. First off, open Safari on your iOS device and head over to beta.apple.com.
Step #2. Next, tap on Sign Up button.


Step #3. Now, you need to sign in to the Apple Beta Program using your Apple ID and password.


Step #4. Tap on Allow while you receive Popup saying “Apple ID Requested example@example.com.”


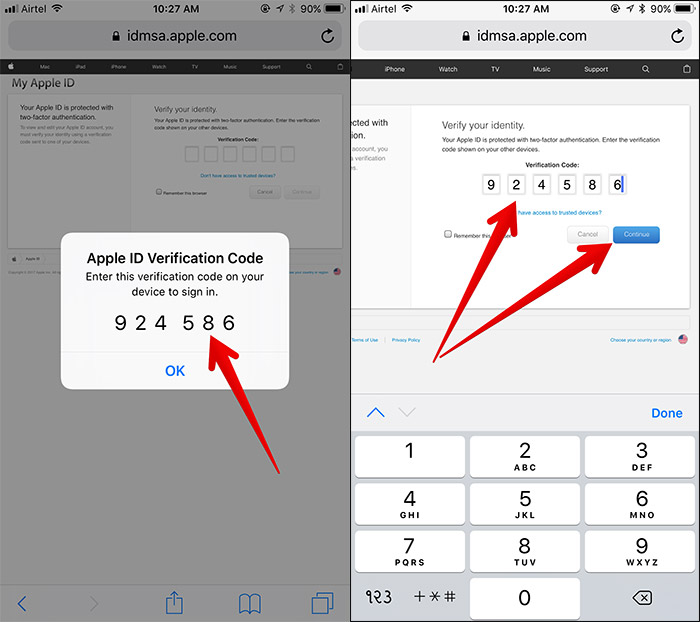
Step #5. You will receive the six-digit verification code on your iDevice; enter it and tap on Continue.


Step #6. Next, scroll down and tap the Accept button at the bottom right-hand corner of the Agreement page.


Step #7. Next up, you need to tap the iOS tab.


Step #8. Now, tap on the iOS tab to to enroll your iOS device ) which is next to Guide section.


Step #9. Up next, tap on the Download Profile button.


Step #10. Now, iOS beta software profile will open in the Settings app. You need to tap on Install at the top right. Tap on Install on the Consent page. Tap on Installagain at the bottom to confirm.


Step #11. Tap Restart in the popup.

The beta profile will now download on your iOS device. You need to wait patiently until the process is completed successfully.

How to Install iOS 11 Public Beta on iPhone and iPad

Step #1. When your device has rebooted, open Settings app → General → Software Update.

Step #2. Tap the Download and Install button.


Step #3. Tap on Agree at the bottom right-hand corner of the Terms and Conditions page.
Step #4. After downloading process is completed, tap Install Now to start the installation.
Once the installation process is completed, set your device as new or restore it from previous iTunes backup.

Video: How to Install iOS 11 Public Beta on your iPhone or iPad